


From SSKE
| The Data Toolbar
Learn to tag data in articles |

|
|
I magine that your colleague Fred was so busy with his other work that he forgot to start an important task. Thus, you would like to remind him of his important task, say to update a screenshot in the documentation. You also want to add a deadline and relate it to "Test project". Therefore you create a new task named "Update screenshot" and tag the data in the article.
Create a new task
You can create a new task in this wiki by creating a new article.
- Open this article in a second tab to have the instructions and your new article side-by-side.
- Click on the "Create New Article"-link in the header of the wiki. The "Create New Article"-lightbox will open.
- The "Create New Article"-lightbox gives you a number of ready-to-use article creation alternatives.
- Enter the name of the new task that you want to create, e.g. "Update screenshots".

Note: If the string input field turns red, then the names is already used and you have to choose a different one!
- Select the "Empty Article in WYSIWYG editor" option.
- Click on "OK". A new article will be created and the WYSIWYG editor opens.
- Copy the following box and paste it into the WYSIWYG editor:

Task: Update Screenshots
- Description
During the next phase, it is necessary to update the screenshots in the internal documentation.
- Assignee
User:Fred
- Start time
July 1, 2011
- Deadline
December 1, 2011
- Related to
This task is part of The famous Test project.
Result: You have now a text about this task in your WYSIWYG editor. You will now create semantic annotations in the text.
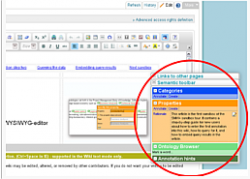
Switch ON the Data Toolbar
In the WYSIWYG editor you switch on the tool "Data Toolbar". This tool supports you in creating semantic annotations.
- Click on the "Data Toolbar" icon in the WYSIWYG editor to switch on the Data Toolbar.
- The Data Toolbar must be visible as an overlay in the WYSIWYG editor.

Note: If the Data Toolbar is NOT visible then you should click again on the Data Toolbar icon in the WYSIWYG editor.

Result: You have activated the Data Toolbar in your WYSIWYG editor.
Tag a category
You annotate a category tag in the article.
- In the "Categories"-section of the Data Toolbar, you click on Annotate.
- Type in the Category: field: Smwplussandbox/Task
- Click Add


Result: A category tag for the category "Smwplussandbox/Task" has been created at the bottom of the article.
Tag properties
Now, you tag the data that is given in the richt text like e.g. say: "This is a start date", "This is an assignee" etc. Such tags are also referred to as "property annotations".
- Select the description of the task with the mouse pointer to open the Tagging floatbox.
- The Tagging Floatbox opens:
- Enter Smwplussandbox/Description in the field Property. If you press Ctrl + Alt + Space, the autocompletion feature appears and you can also choose out of already existing properties.
- Click Add. The highlighted text indicates the annotation. Click
 to delete the annotation; click
  to edit the annotation. Now you can continue with the other annotations.
- Mark "User:Fred" with the mouse, enter Smwplussandbox/Assigned to and click Add
- Annotate the start date with the property Smwplussandbox/Start date: July 1, 2011
- Annotate the end date with the property Smwplussandbox/End date: December 1, 2011
- Annotate "The famous Test project" with the property Smwplussandbox/Related to project
- Verify the completeness of your tags
- Click on the Save page button (at the left bottom of the article) to save the article and leave the WYSIWYG editor.
- Inspect the "Factbox" at the bottom of the article to verify the correctness of the data that you have just tagged


| Note: | If the data that is displayed in the factbox does not fully correspond to the data that you have tagged then open the article again and correct your annotations in the WYSIWYG editor. |
Result: Your article contains tags for the description, assignee, start-, end-date and related project.
Inspect the tasks in your Wiki
Once the data has been tagged, you can use it for query anserwering. The table below lists all tasks that have been tagged in this wiki:
| Start date | End date | Assigned to | Description | |
|---|---|---|---|---|
| Compile a functions overviewwarning.png'Compile a functions overview' may not use property 'Part of bundle', according to property definition. | 2455879.514 November 2011 | 2455896.51 December 2011 | Fredwarning.png'Fred' may not use property 'Part of bundle', according to property definition. | We need an overview of all the functions provided with our new flight simulator version. |
| Make the flight demo workingwarning.png'Make the flight demo working' may not use property 'Part of bundle', according to property definition. | 2456171.51 September 2012 | 2456175.55 September 2012 | Fredwarning.png'Fred' may not use property 'Part of bundle', according to property definition. | There are still some problems with the demo version of the fligth simulation software. Please make it work! |
| New task | 2456057.510 May 2012 | Irina.turcu | To finish demo. | |
| Visit Sarah for the next steps meetingwarning.png'Visit Sarah for the next steps meeting' may not use property 'Part of bundle', according to property definition. | 2455896.51 December 2011 | 2455571.510 January 2011 | Fredwarning.png'Fred' may not use property 'Part of bundle', according to property definition. | Meet with Sarah to talk about the next steps we have to do for placing the flight simulator in the market. |
| Note: | If you have created new tasks and annotated them correctly then you should come back to this article to inspect if they appear in the list below. If they do NOT appear then you are probably missing the category annotation "Task in sandbox" in your new tasks! |
| Note: | To update the page and get the latest changed facts, click on the "Refresh Page"-link below |
Next Lesson
E verything went fine? Good. Let us also hint you at the "tabular forms" as a result format that lets you even change values and add instances directly into the table, i.e. without creating a new article. This is the most comfortable way to create e.g. a new task for Fred that will be also reflected immediately in Mikes articles and tables.
| |
|
|
|---|---|---|
| It's time to go to the next sandbox: create queries for the data in the wiki and embed the results in articles. |
|
|
| Part of bundle | Smwplussandbox + |
| Rationale | This article is the second lession of the SMW+ sandbox tour. It contains a step-by-step guide for new users about how to enter the first annotation into this wiki, how to query for it, and how to embed query results in the article. + |