From SSKE
| The WYSIWYG Editor
Learn to create appealing articles |
|
|
I magine you are working together with Fred, who is one of your friendly colleagues in the really important "Test project". He is in charge of creating an article to give his colleagues an informative overview of the project. In this first lession you are learning everything you need use the WYSIWYG editor.
Create a new article
- Open the wiki in a second tab or window to have the instructions and your new article side-by-side.
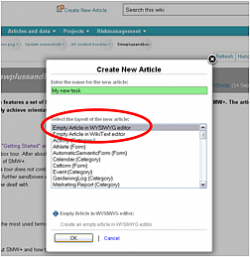
- Click on the "Create New Article"-link in the header of the wiki. The "Create New Article"-lightbox will open.
- The "Create New Article"-lightbox gives you a number of ready-to-use aricle creation alternatives.
- Enter the name of the new article that you want to create, e.g. "Overview for Test Project".

Note: If the string input field turns red, then the page-name is already used and you have to choose a different one!
- Select the "Empty Article in WYSIWYG editor" option.
- Click on "OK". A new article is opened in the WYSIWYG editor.
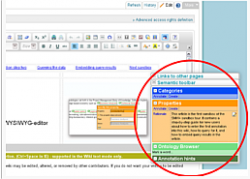
- Before you enter text in the WYSIWYG editor you must make sure that the Data Toolbar is switched off!
Result: the WYSIWYG editor is opened and you can start to enter richtext.
Switch OFF the Data Toolbar
In the WYSIWYG editor you must switch OFF the tool "Data Toolbar". This tool supports you in creating semantic annotations.
- Click on the "Data Toolbar" icon in the WYSIWYG editor to switch OFF the Data Toolbar.
- The Data Toolbar must NOT be visible as an overlay in the WYSIWYG editor.

Note: If the Semantic Toolbar is visible then you should click again on the Data Toolbar icon in the WYSIWYG editor.
Result: You have de-activated the Data Toolbar in your WYSIWYG editor.
Layout text
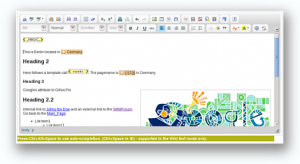
The WYSIWYG editor will provide you with this toolbar once you have clicked on "edit":
You will find typical Microsoft Word buttons here, but also some SMW+ specific ones. We don't have to explain the buttons in detail at this point, because you will find tool tips before clicking on them with your mouse. Additionally, you will learn what they do if you simply try them out. However, a detailed overview can be found in the corresponding WYSIWYG help article.
We propose that you start with typical layout functions such as headings, text size or fonts and other formatting stuff (enumerations etc.). You can also copy and paste stuff you already have on your machine, e.g. Excel spreadsheets or (parts) of other documents. Then you could add some images and arrange them with tables (if you would like to use your own images, please upload them via the upload button first).
For more inspiration, we also have a ready example of the Test project overview.
Create a table
- Place the cursor on the position where you wish to insert the table.
- Hit the table button
 on the toolbar.
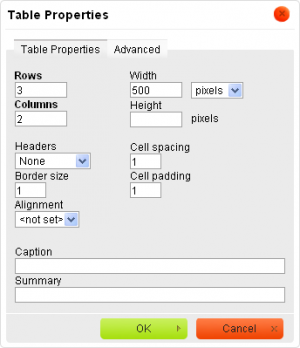
- The Table Properties dialog appears.
- Define the table properties.
- Submit the dialog by clicking on "OK"
Result: the table has been pasted into your document. You can enter richtext into table cells.
Read more about tables in the user manual: Adding tables with the WYSIWYG editor
Insert an image
- Place the cursor on the position where you wish to insert the image.
- Click Insert/Edit image
 button in the toolbar.
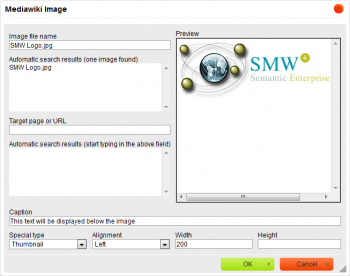
- A pop-up window called "Image Properties" appears:
- A pop-up window called "Image Properties" appears:
- Enter the name of the image file as it was saved in your Wiki.
- Automatic search feature will help you to filter your image.
- If you wish to embed the image as a thumbnail, write a brief description in the Caption textfield and select Thumbnail in the dropdownlist Special Type
- You can also make modifications in your image:
- Specify the type using Special Type dropdownlist: Thumbnail, Frame or Border (see example below)
- Adjust position using Align dropdownlist: Right, Left, Center
- Change image size using Width and Height textfield in pixel
- Click OK.
Result: the image is embedded in your document.
| Note: | You can only embed images that have been uploaded to the Wiki. It is NOT sufficient to drag and drop an image into the WYSIWYG-editor for uploading! Instead you must open the Menu item "Upload new images" in the menu: "My dashboard"! |
The Rich Media extension makes handling images, documents and other media easy! Click to get the Rich Media extension!
Insert a link to another article
- Place the mouse on the position where you want to add the link
- Click on the link button
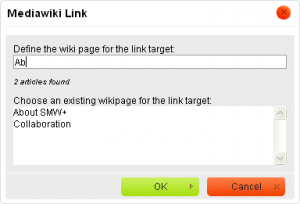
 - this opens the Mediawiki dialogue box.
- Type in the name of the article you want to link as it is stored in the wiki in the "Define the wikipage for the link target:" entry box - as you do this the content of the "Choose an existing wikipage for the link target" box will change and you should see the name of your desired article.
- Select the page and click "OK"
Result: a link to the page is embedded in your document.
Next Lesson
We also prepared a ready example of the Test project overview here. You can also try out the WYSIWYG editor and learn about the tabular forms there. This is a very handy tool to add and change data directly in the table without using the annotation mode!
| |
|
|
|---|---|---|
| Tried out enough? Then it's time to go to the next sandbox: tagging data in articles |
|


